Starting a captioning project
A CADET project is composed of a media clip and the captions or descriptions that correspond to the clip. When you open a previously saved project, CADET automatically opens the media clip and the corresponding captions or descriptions.
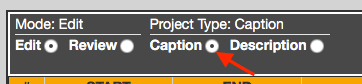
- Start CADET and select Caption from the Project Type radio button group located at the top of the editing window. (You can also press CTRL-D to toggle between Caption and Description modes.)
Note: A CADET project can contain captions or audio descriptions, but it cannot contain both. If you want to write descriptions for the video that you are also captioning, you must create a separate CADET project. - Open the media clip that you want to caption. CADET can open either a local clip (one that is stored somewhere on your computer) or a remote clip that resides on YouTube, Vimeo, Facebook, or some generic web server. In the case of a local media clip, CADET builds a player using HTML5 video elements and caption look and feel is controlled by the browser running CADET. In the case of YouTube or Vimeo, CADET uses those services' embed objects for the player, and captions are emulated by CADET. In the case of a generic remote clip, playback is a hybrid of HTML5 for video and emulation for the captions.
- To open a local clip:
- Open the menu and select , or press CTRL-M.
- In the dialog, navigate to and select the media clip that you want to caption. This step is required in order to actually see captions in the player. Selecting the media clip will close the dialog.
- To open a remote clip:
- Open the menu and select , or press CTRL-SHIFT-M.
- In the dialog, type (or paste) the full public URL to your clip (e.g. https://vimeo.com/12345). Note that for Youtube, Vimeo, and Facebook, the clip must be available to the public. If it's being suppressed due to purported copyright infringement issues, it will likely fail to open in CADET.
- To open a local clip:
- Save the project by opening the menu and choosing, or press CTRL-S. You can save the project to any location with whatever name you like. It's common to name the caption project after the media clip. For example, if you're creating captions for a video called "arthur.mp4," you might name the CADET project "arthur." CADET will automatically append the ".cadet" extension, resulting in a file named "arthur.cadet".
Creating captions
The process of captioning involves transcribing the audio track into text snippets (captions) and timing those captions to match the audio in the media clip. Some people like to transcribe large chunks of the audio and then go back later and time the captions. Others prefer to transcribe and time as they go.
Begin by transcribing caption text directly into CADET, or import an existing caption transcript into the editor.
Transcribe text into CADET
To transcribe captions directly into CADET, follow these steps.
- Press CTRL-spacebar to start playing the media clip and listen to a bit of the audio.
- Pause the media player (CTRL-spacebar). Make sure the cursor is in the first cell of the "Caption" column and then type the caption that corresponds to the audio you just heard.

- Press the Enter key twice to insert a new caption row in the editor. The cursor will automatically be positioned in this new row.

- Press CTRL-spacebar to play the media clip again.
- Pause the player (CTRL-spacebar), transcribe and press the Enter key twice to create a new caption row.
- Repeat these steps until you are done transcribing either the entire clip or a section of the clip. When you reach the last caption, press the Enter key twice to insert a blank row at the bottom of the caption editor.
- Move on to the next section to learn how to assign timecodes to each caption.
Import a plain-text caption transcript into CADET
If you already have a plain-text transcription of the audio track, you can import this directly into CADET instead of transcribing into the editor. Be sure that the plain-text file has an extra carriage return or blank line between each new caption. Doing so will ensure that CADET imports each caption into a discrete cell in the editor. The following example shows how to format a plain-text file properly.
	I have great news!

	(Everyone) What is it Arthur?

	Mr. Rogers is coming
	to our school tomorrow!
Note that the third caption is actually a two-line caption which will appear in a single cell of CADET's editing table.
You cannot import Word files into CADET. If your transcript is saved in a Word document, save it as a plain-text file and then import that file into CADET.
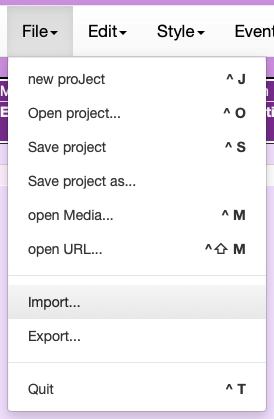
To import the transcript into CADET, open the menu, select .
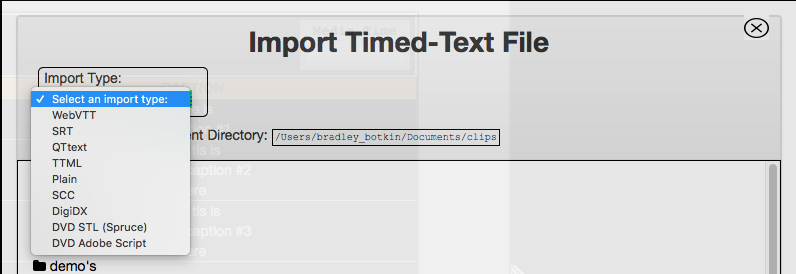
In the dialog, select "Plain" from the Import Type drop-down list. Navigate to the text file that you want to import, then select it. CADET will insert the text above the current row, pushing the current row and everything below it down further in the table (just like when you paste text into a document in a word or text processor.)
If the plain-text file that you want to import is formatted as a single paragraph of text, CADET will import the whole paragraph into a single cell of the editing table. You can then break this block of text into discrete captions by using the double-Enter feature of the editor: just position the cursor at the point in the text where you want to end one caption and begin another, then press the Enter key twice. This will insert a new caption row into the editor, and will also move the remaining text into this new row.
After you import the plain-text file (and format the text into captions, if necessary), assign timecodes to each caption.
Import an existing caption file into CADET
You can also import an existing caption (timed-text) file into CADET. CADET currently can import WebVTT, SRT, TTML, QTtext, SCC, and several other files. This is especially useful if you take advantage of automatic speech-to-text services, like YouTube's automatic captioning, and want to download and clean up the many errors in transcription and timing that are typically part of such services. Simply open the menu, select and choose the appropriate file format. Note: CADET will only import text and timecodes from pre-existing caption files. It does not currently import any styling information or other markup.
After you import an existing caption file, you can re-edit or re-time the captions as necessary.
Timing captions
Timing captions involves assigning Start and (optionally) End times to each caption event. These represent, respectively, the times that a caption appears and disappears. If no End time is specified, its End time is implicitly the Start time of the next event.
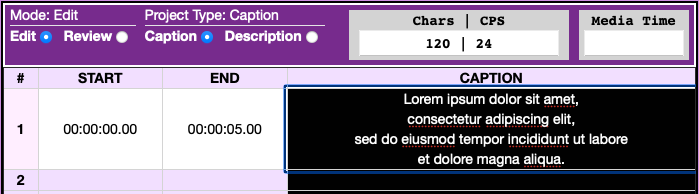
Depending on the preference setting for "Show CC Reading Rate", the user interface might include the reading rate metrics area shown below. That area includes word-count and words-per-minute, or character-count and characters-per-second, depending on the other related preference settings:
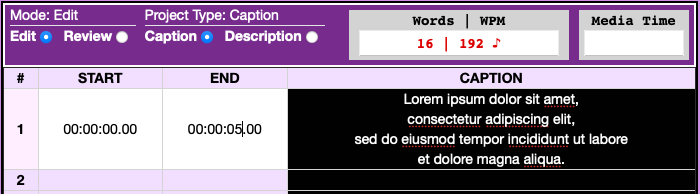
Show CC Reading Rate checked, words per minute (WPM), showing error
Show CC Reading Rate checked, characters per second (CPS), no error

Show CC Reading Rate un-checked
With this in mind, follow these steps to assign timecodes to each caption.
Note: The steps to time a series of events depend on whether or not the Preferences setting for "Auto Advance Current Event" checkbox is checked. If that setting is unchecked, no auto-advance occurs and the process is fully manual, no assist is provided by CADET.- "Auto Advance Current Event" checkbox is CHECKED. This method is optimized for workflows of transcribing sets of captions first, and then going back to time them during playback. While the media clip is playing, "Set Start Time" command advances the current event automatically and "Set End Time" sets the end time of the previous event. The current event is automatically positioned to accept a new "Set Start Time" command while the clip is in motion. This method favors maximizing the on-screen time of captions.
- Rewind the media clip to the beginning.
- Put the cursor anywhere in the first caption cell.
- Play the clip by pressing CTRL-spacebar. When you hear the audio for the first caption, immediately press CTRL-comma ("Set Start Time" shortcut). This will grab the timecode from the player at that instant and insert it into the "Start" cell for that caption, indicating the time at which that caption will appear on the screen. CADET will automatically advance into the next caption cell, preparing it for the next "Set Start Time" command.
- With the video still playing, press CTRL-comma when you hear the audio for the next caption.
- Continue to press CTRL-comma for each successive caption.
- For captions with longer periods of no dialog, press CTRL-period ("Set End Time" shortcut) to insert an end time into the editor at around 2-3 seconds after the end of the dialog to set the end time of the previous (due to the auto advance) event.
- When you reach the last caption in the set of events you're timing, be sure to assign a final stop time to that caption by pressing CTRL-period.
- If the Auto Advance Current Event is not set, then you will have to manually advance the selected event.
- "Auto Advance Current Event" checkbox is UNCHECKED. This method is optimized for transcribing and timing as you go, and is essentially manual. "Set Start/End Time" commands insert respective start/end times in the current event regardless of the play/pause status of the player. The user navigates the event table manually.
- Put the cursor anywhere in the caption cell you want to time.
- Play the clip by pressing CTRL-spacebar. When you hear the audio for the first caption, immediately press CTRL-comma. This will grab the timecode from the player at that instant and insert it into the "Start" cell for that caption, indicating the time at which that caption will appear on the screen.
- If you wish to set an end time due to a longer period of no dialog after the caption, press CTRL-comma when the player is at the place in the timeline where you wish the caption to disappear.
- Move to the next event, and repeat the process above for all events in the set you're timing.
Reviewing captions
Once you have transcribed, edited and timed your caption project, review your work by following these steps.
- Press the "Review" button at the top of the editor (or press CTRL-E to toggle from Edit to Review mode).
- Rewind and play the video, and you will see captions displayed over the video in the player. If you see errors in the text, simply stop the video, make a correction, rewind a bit and play the video to see the corrected text in the player window.
- If you need to correct a timing error, simply position the video at the new spot in the timeline where you want the caption to appear, place the cursor in the appropriate cell in the caption editor and press CTRL-comma to insert the new timecode. (See the list of keyboard shortcuts for commands that will move the video playhead in small increments, giving you frame-accurate timing.)
Now you're ready to export a timed-text caption file for use with your target media player.
Exporting captions
You've created captions or you've imported an existing timed-text file, and you've edited, timed and reviewed the captions using CADET's built-in media player. But CADET's player is not your ultimate target player. You're likely creating captions to be displayed on YouTube, Facebook or Vimeo; in an embedded browser player using HTML5's media elements (such as video and track); or in a custom Web-based player that you built yourself. In any case, you'll need to export the captions from CADET into a timed-text format that's suitable for your target browser or media player.
If you captioned a remote video (from Youtube, Facebook, or Vimeo), you should note that CADET will not integrate your captions with the remote video platforms. That's a step that you must undertake yourself. Read instructions for uploading caption files to YouTube, and instructions for uploading caption files to Vimeo. But also note that you will have to export your caption project from CADET, so keep reading this section.
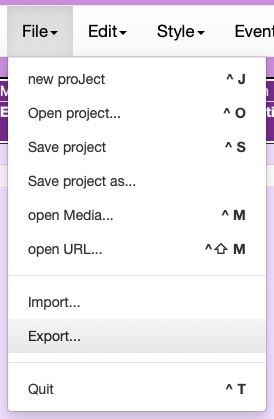
To export your caption project, open the menu and select .
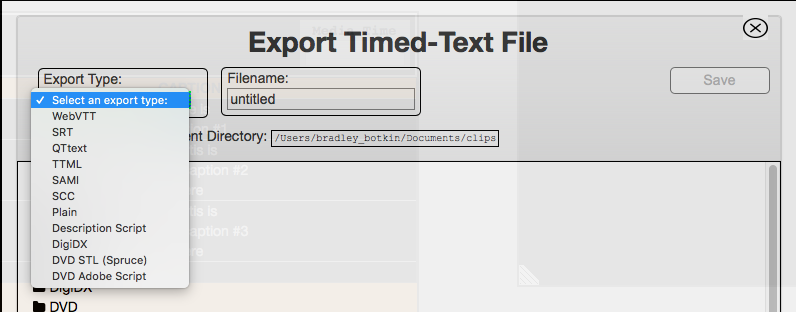
In the dialog, select the timed-text format that you want from the Export Type drop-down list. (See the timed-text format table below for typical timed-text formats associated with browsers, video-hosting Web sites, and stand-alone applications.) By default, the name of the file will be the same as the base name of the media clip. Change the filename if you want to, then press the Save button.
When you click the Save button, CADET will do some error checking (e.g., verifying timecode continuity) and if it passes the checks, CADET will export a file of the type requested, displaying an alert indicating the file location. (If CADET finds problems, the errors are listed in the Status box located directly below the media player. Each error is displayed as a clickable link which will take you directly to the caption with the problem.) The name of the exported file will be the same as the media clip you're using in your project, with an extension that corresponds to the type of export format that you selected. For example, if the media clip in the project is named "arthur.mp4", and if you want to export a WebVTT caption file, the name of the exported caption file would be "arthur.vtt", and it will be saved in the same location as the video clip.
Timed-text formats and platforms
The following table shows typical timed-text formats that are compatible with various browsers and media-hosting Web sites.
| Browser platform, Web site or application |
Compatible timed-text formats |
|---|---|
| Internet Explorer (using HTML5 <video> element) |
|
| Firefox, Chrome or Safari (using HTML5 <video> element) |
|
| YouTube |
|
|
|
| Vimeo |
|
| Quicktime Player |
|
| DigiDX (Description authoring application) |
|
| DVD authoring applications (DVD Studio Pro, Encore, etc.) |
|
Offsetting captions
Offsetting allows you to quickly retime all or part of a caption file that has existing timecodes. Once you specify a new timecode from which to offset, CADET will alter all subsequent timecodes relative to the existing timing intervals. Using the timecodes that you provide, CADET can offset all timecodes-- that is, both the start and end times-- or it can offset only the start times or only the end times.
Follow the steps below to offset an entire caption file, or a section within a caption file. The examples below show you how to offset all timescodes. If you want to offset only the start or end times, be sure to select the appropriate radio buttons.
Offset the entire caption file
- Place the cursor in the first cell of the editor.
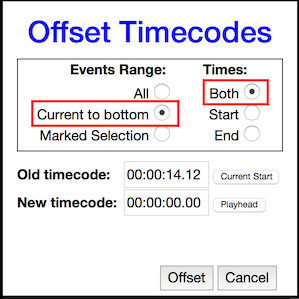
- Open the menu and select . This will open the Offset Timecodes dialog.
- In Events Range, select the All radio button.
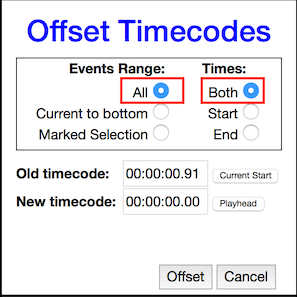
- In the New Timecode input, type the new timecode for the first caption. You can also move the playhead to the new timecode in the video timeline (prior to opening the Offset Timecodes dialog) and then select the Playhead button next to the New Timecode input.

- Press the Offset button.
Offset from a specific point to the end of the caption file
- Place the cursor in the cell at the beginning of the section to be offset.
- Open the menu and select .
- In Events Range, select the Current to Bottom radio button.
- In the New Timecode input, enter the new timecode for the first caption. You can also move the playhead to the new timecode in the video timeline (prior to opening the Offset Timecodes dialog) and then select the Playhead button next to the New Timecode input.
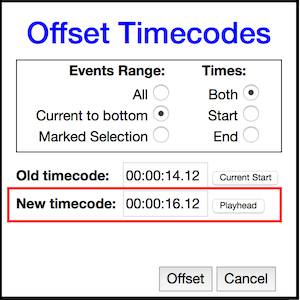
- Press the Offset button.
Offset a section of a caption file
- Place the cursor in the first cell of the section that will be offset.
- Hold down CTRL-Shift, then press the down arrow until you get to the final cell of the section that will be offset. (You can also put the cursor in the first cell of the section, then Shift-click in the final cell of the section.) Note that each row that is part of the offset block will have an asterisk next to the row number itself.
- Open the menu and select .
- In Events Range, select the Marked Selection radio button.
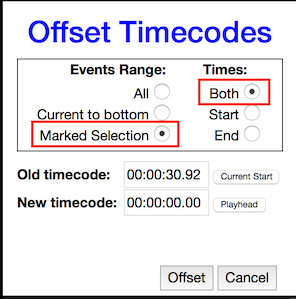
- In the New Timecode input, enter the new timecode for the first caption. You can also move the playhead to the new timecode in the video timeline (prior to opening the Offset Timecodes dialog) and then select the Playhead button next to the New Timecode input.
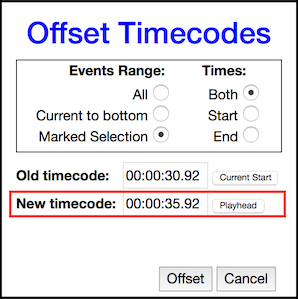
- Press the Offset button.
Styling captions
CADET provides support for several different types of caption-styling features. Bear in mind, though, that not all of these features are supported by all browsers or players. Even though you might style specific captions in CADET with red text, or you might position certain captions to appear at the top edge of the video region rather than at the bottom, there is no guarantee that these captions will appear in all players as you have styled them within CADET. Therefore, always test to be sure that the styles you select are supported in any known target media players. Note that it is not required that you select any styles in your caption project. CADET's default text styles (white text over a black background, positioned at the bottom center of the video region) are universally supported.
Making captions bold, italic or underlined
Captions can be made bold, italic or underlined by simply highlighting the text in the editor and choosing the styling type from the menu, or by using the appropriate style keyboard shortcuts. Please see the note about support for caption styles in media players before choosing text colors.
Adding color to text
Color can be added to captions by highlighting the text in the editor, then choosing the color that you want from the > menu. Please see the note about support for caption styles in media players before choosing text colors.
Adding color to the background
Color can be added to the caption-text background (that is, the background directly behind each character in a caption block) by highlighting the text in the editor, then choosing the background color that you want from the > menu. Please see the note about support for caption styles in media players before choosing background colors.
Aligning captions
When you choose caption-alignment options, you are determining where within the video region the caption text will be displayed. CADET's default setting for caption alignment (or placement) is the bottom center of the video region.
Captions are traditionally positioned on the screen to indicate who is speaking. In situations where the captions represent a voiceover narrator, or a single person on the screen (sometimes referred to as a "talking head"), bottom-center placement is the appropriate style to choose (and since this is CADET's default alignment, you don't need to do anything to achieve this alignment). If you want to position captions to the left or to the right, simply place the cursor in the appropriate caption cell and choose Left or Right from the > menu. If you want to move captions to the top or middle of the video region, choose Top or Middle from the > menu. Top-aligned captions are indicated in the editing grid with a Black Up-Pointing Triangle (▲) following the row number, while middle-aligned captions are indicated using a Black Medium Diamond (⬥).
Note: Caption-alignment commands affect single captions-- that is, if you position a caption at the top of the screen, only that caption will move to the top. The next caption will return to the bottom-center of the screen (CADET's default placement) unless you assign another top-alignment command to that next caption. If you want to realign (or reposition) two or more captions, simply select those multiple caption rows (using CTRL+Shift+up or down arrow, or Shift+click with a mouse) before you choose the alignment command. All captions in that selected block will now be realigned. Before repositioning captions, see the note about support for caption styles in media players.