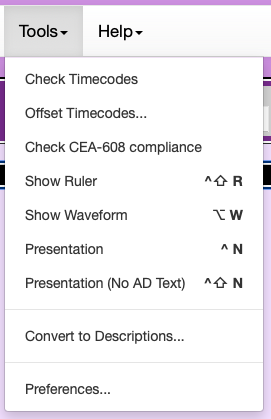
The Tools menu contains a number of functions which may be useful for authoring captions and/or descriptions.
The functions include various pre-flight checks (Check Timecodes, Check CEA-608 Compliance) which might otherwise be flagged during Export attempts, as well as tools for alleviating errors found by those inspections (Offset Timecodes, Show Ruler).
There is an additional tool for converting a caption project with timecodes to a description project.
Finally, CADET preferences are accessed from the Preferences menu item.
Check Timecodes
The Check Timecodes tool checks the start/end times to make sure that there are no anomalies, such as out-of-order (i.e., non-ascending) timecodes.

- Open the menu and select .
- Errors will be displayed as links in the Status area. Clicking on a link will move the cursor to that error in the editor.
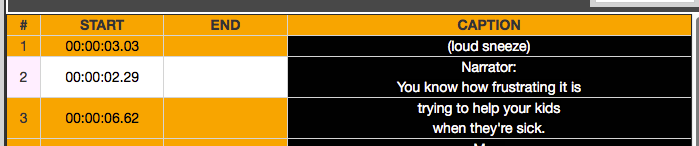
The image to the right shows a sample timecode error, where a caption's start time is specified before the preceding caption's start time).
Offset Timecodes
The Offset Timecodes tool allows you to easily change the timecodes for a block of captions.
- Open the menu and select .
- Errors will be displayed as links in the Status area. Clicking on a link will move the cursor to that error in the editor.
- Learn more about offsetting caption timecodes.
Check CEA-608 Compliance
The Check CEA-608 Compliance tool makes sure that the captions can be successfully exported to the .SCC format. Note that each caption row may not exceed 32 characters (see the Show Ruler tool for more information).
- Open the menu and select .

- Errors will be displayed as links in the Status area. Clicking on a link will move the cursor to that error in the editor.
The image to the right shows a sample line-length error, where the second row contains more than 32 characters.
Show Ruler
The Show Ruler tool displays a ruler (of user-settable length) above the current caption. This will help you determine when rows are too long for the .SCC or other format. When the ruler is visible, CADET shows the caption column in a monospaced font. The default is 32 characters to meet CEA-608 Compliance. To change the length of the ruler, open Preferences dialog and set the Ruler Length.

- Open the menu and select .
- The ruler is displayed above the current caption.
Show Waveform
The Show Waveform tool displays a waveform visualization of the audio track of the currently loaded media. It works with local media as well as with generic URLs. It does not work with Youtube or Vimeo media. There is a zoom slider which zooms the waveform, and a cursor which displays the timecode when hovering over the waveform.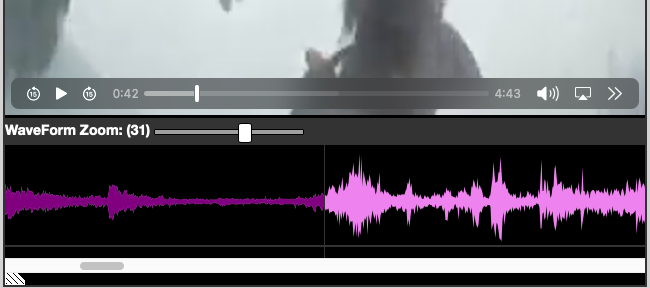 The waveform can help in pinpointing places in the timeline, especially when trying to maximize the time for descriptions. It should be noted, however, that for complex audio fields with lots of noise or loud sounds, it may not be possible to visually discern dialog in the waveform.
- Note: It may take quite some time to generate the waveform when opening a URL, as waveform construction cannot be completed before the entire clip is downloaded.
- Note: The waveform is currently created from scratch each time. There is currently no way to save a waveform or load a previously saved waveform.
- Note: The Tools / Preferences pane contains a setting to show the waveform; by default it will display when possible.
- Open the menu and select .
- The waveform is displayed below the player.
- The slider control above the waveform controls the zoom factor of the waveform.
- The horizontal scroll control below the waveform is shown if the waveform width (at the current zoom value) is wider than the player.
Presentation
The Presentation tool puts the player in full-screen mode. This can be useful for reviewing a project or for playing the media with captions and/or descriptions in a classroom or other setting where a large screen is desirable. In normal window sizes (not full-screen), captions are displayed for caption projects, while descriptions are displayed for description projects.
For description projects in CADET, pressing the shortcut key while holding down the Shift key will suppress the on-screen display of the description text, thus providing a realistic, TTS-described presentation. (Read more about reviewing TTS descriptions.)
- Open the menu and select .
- The screen is switched to full-screen mode.
- To exit full-screen mode, press the Escape key.
Convert to Descriptions
The Convert to Descriptions... tool converts a caption project into a description project. Note: A CADET project can contain audio descriptions or captions, but it cannot contain both. If you want to write captions for the video that you are also describing, you must create a separate CADET project.
- Open the menu and select .
- The new CADET description project is displayed, and the Save As dialog is shown.
- Save the project.
After saving the project, you will see a new editing grid with an additional Audio Cue column. The text in this column represents the caption that appears just before the pause in the audio where a description will be inserted. Also note that the timecodes in the Start and End columns correspond to any gaps in the display of captions: that is, the end time of a caption has been converted to be the start time of a description, and the start time of a caption has been converted to be the end time of a description.
Preferences
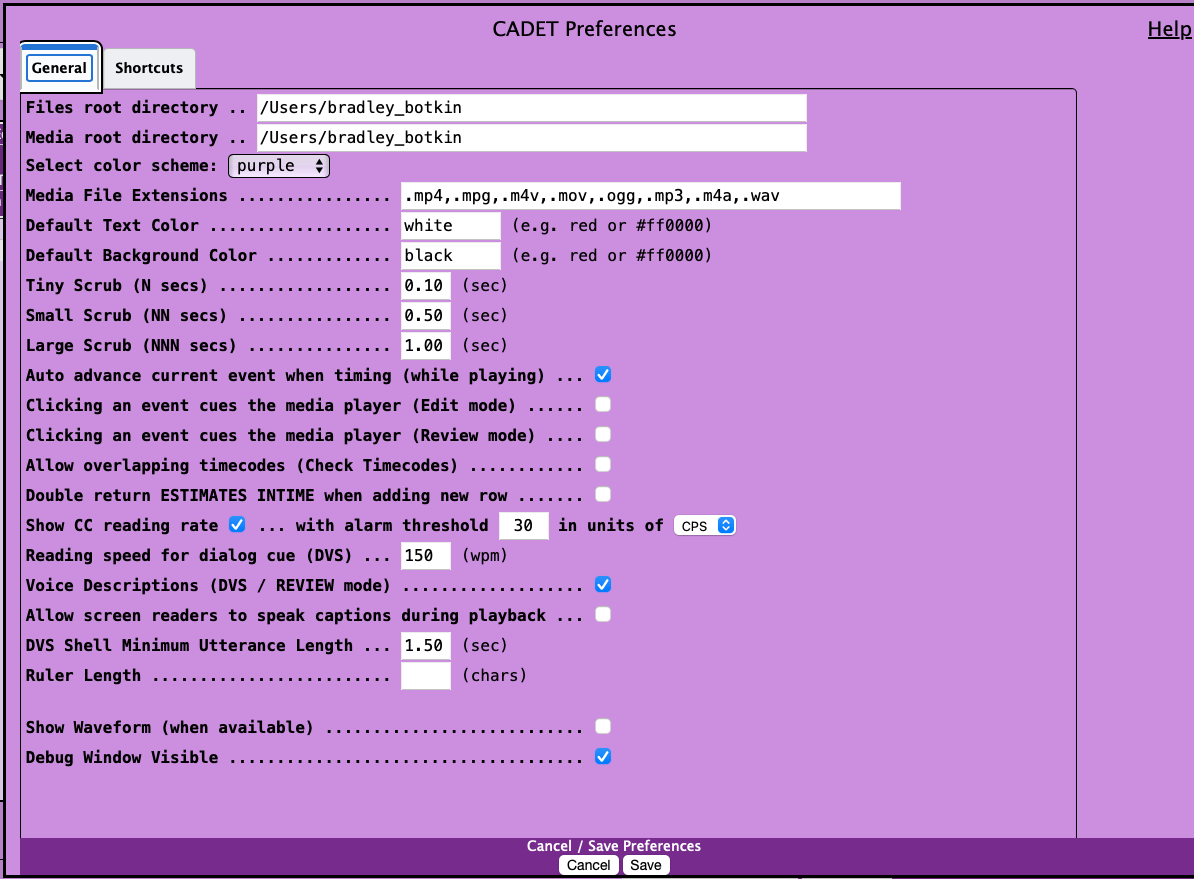
The Preferences... tool displays all the adjustable CADET preferences, including the custom keyboard shortcut editor. It is presented as a tabbed dialog, with General and Shortcuts tabs.
General tab
- Open the menu and select .
- There are two tab options, and .
- Edit the choices as appropriate.
- Press before closing to confirm changes, or to not apply changes.
Definitions of each preference are as follows:
- Files root Directory:This is the location on your hard drive where CADET starts looking for files and saving projects; you can change the folder path. Mac defaults to /Users/some_user. For external drives on Mac use /Volumes/DriveName. On Windows the default is C:/Users/UserName. For external drives simply change the drive extension to match the desired location such as E:/ or B:/.
- Media root Directory:This is the location on your hard drive where CADET starts looking for media files; you can change the folder path. Mac defaults to /Users/some_user. For external drives on Mac use /Volumes/DriveName. On Windows the default is C:/Users/UserName. For external drives simply change the drive extension to match the desired location such as E:/ or B:/.
- Select color scheme: The options are Default Orange, Purple, Teal, and Gray. These color schemes all meet WCAG AA color contrast requirements; pick your favorite!
- Media File Extensions: Defaults to .mp4, .mpg, .m4v, .mov, .ogg, .mp3, .m4a, .wav. These are the type of media files that work with CADET.
- Default Text Color: The color of the text in the caption field. The default is White; but can be changed using any color text or hex code.
- Note: if you change the default we can not guarantee that it meets contrast guidelines. Also, many timed-text formats do not support styling.
- Default Background Color:The color of the background in the caption field. The default is Black; but can be changed using any color text or hex code.
- Note: if you change the default we can not guarantee that it meets contrast guidelines. Also, many timed-text formats do not support styling.
- Tiny Scrub (N secs): The amount of time that you go backwards or forwards when doing a small scrub (Ctrl G = Backwards, ctrl H = forwards) in N seconds; default 0.1.
- Medium Scrub (NN secs): The amount of time that you go backwards or forwards when going a medium scrub (Ctrl shift G = Backwards, ctrl shift H = forwards) in NN seconds; default 0.5.
- Large scrub (NNN secs): The amount of time that you go backwards or forwards when going a large scrub (Ctrl shift alt G = backwards, ctrl shift alt H = forwards) in NNN seconds; default 5.0.
- Auto advance current event when timing (while playing): When checked and media is playing, focus will be moved into the next caption row when insert start time shortcut is used. And the insert end time short cut will insert the end time into the row above. When unchecked focus will stay in the current row when insert time is pressed, and insert end time will go into the row with current focus.
- Please refer to Timing Captions for more detailed information on how to use either of these settings.
- Clicking an event cues the media player (Edit mode): When checked, in Edit mode selecting a caption row will move the media player time to match.
- Note: this is currently only on mouse click, not keyboard focus.
- Clicking an event cues the media player (Review mode): When checked, in Review mode selecting a caption row will move the media player time to match.
- Note: this is currently only on mouse click, not keyboard focus.
- Allow overlapping timecodes (Check TImecodes): Disables the error that occurs when timecodes overlap. For example overlapping vocals that overlap and come and go. Default off.
- Note: WebVTT is one of the few formats that allow for overlapping timecodes.
- Double return ESTIMATES INTIME when adding new row: When pressing enter/return twice to split a caption into two, it will insert an approximate start time. This is helpful when shortening caption length quickly. Default on.
- Note: Rarely if timing as you go, end times may be stolen and applied to new row. Turn this setting off if experiencing this.
- Show CC reading rate:
 This displays a reading rate for each row of captions at the top of the box, it is always on when creating description works. Default is on.
 - … with alarm threshold XX in units of: Will alert you if rate is above the set amount of XX. Unit options are words per minute (WPM), and characters per second (CPS). Default is 100 WPM.
- Reading speed for dialog cue (DVS): Reading speed for Text-to-Speech in description projects. Default 150 words per minute.
- Voice Descriptions (DVS/REVIEW mode): In Review mode for Description projects the Text-to-Speech engine reads off the text to simulate the audio description track. Default on.
- Allow screen readers to speak captions during playback: Allows screen readers to read the captions as they play on the screen. This is good for checking captions accuracy while using a screen reader. Default off.
- DVS Shell Minimum Utterance Length: Set a minimum time between a StopTime and the next StartTime, below which it won’t create a new Description event row. Default 1.5 seconds.
- Ruler Length: The length of the ruler tool. Displays x number of characters to help keep captions within that amount. Default 32 for .SCC files and CEA-608 compliance.
- Note: remember that users can only read so much so fast, and if content is on the screen for a short amount of time, having a lot of text can be hard to process.
- Show waveform (when available): Displays a waveform for local files and generic remote videos. Default on.
- Note: does not work with other remote files.
- Debug Window Visible: Displays a debug window under the status window. Default off.
- Note: used primarily for programing purposes, not regular CADET functions. But can be helpful for troubleshooting when things are not working as expected.
- Save saves both and tabs.
Shortcuts tab
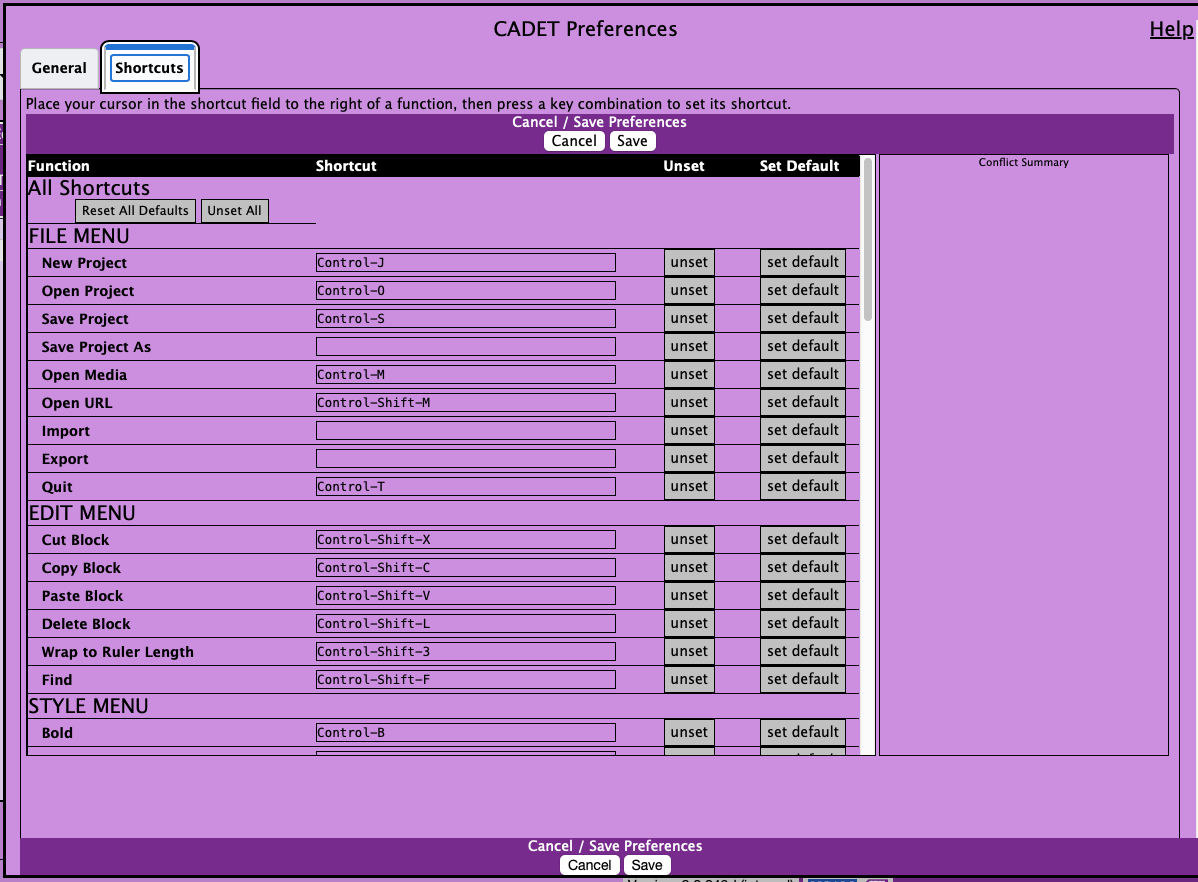
The Shortcuts pane allows you to set your own shortcuts, optimizing them for your OS, browser platform and use-cases.
The rows in the shortcuts table are organized according to their associated menus. The "Miscellaneous" section is for shortcuts which have no associated menu items.
Shortcuts can contain combinations of Control, Shift, and Alt/Option keys plus another key. The exceptions are key combinations which ordinarily result in a printable character (e.g. Shift-P, which is just a capital 'P').
You can Unset or Set Default for a shortcut. Unset All shortcuts, removes all shortcuts and Reset All Defaults will restore all default shortcut settings.
If a shortcut is assigned to 2 or more functions, a collision is said to have occured, and you won't be able to Save the preferences. Resolve any conflicts and save again.
Save saves both and tabs.
- Open the menu and select .
- Select the tab
- Navigate to the Shortcuts column of the function row you would like to change
- Place you cursor in the cell next to the function you want to chance, press the desired key combinations, the key combination will be displayed in the field
- Select save at the top or bottom of the table
- Save saves both and tabs.