Starting a description project
CADET provides tools for writing and timing audio descriptions that can be integrated into a video presentation. It is important to note that CADET does not create or record an audio track of the descriptions that you write; instead, you can use CADET to create the script which a human narrator (or text-to-speech application) will later record as an audio-description track.
The creation process for audio descriptions is sort of a mirror image of that for creating captions: you must first find and timestamp the pauses into which the descriptions will fit, and then write description text to fit within those pauses. (Creating captions, on the other hand, requires that you first write the caption text and then add timestamps.)
Here are the basic steps for writing audio descriptions with CADET.
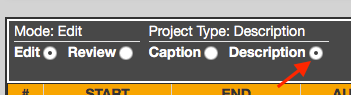
- Start CADET and select Description from the Project Type radio button group located at the top of the editing window. (You can also press CTRL-D to toggle between Caption and Description modes.)
Note: A CADET project can contain audio descriptions or captions, but it cannot contain both. If you want to write captions for the video that you are also describing, you must create a separate CADET project. - Open the media clip that you want to describe. CADET can open either a local clip (one that is stored somewhere on your computer) or a remote clip that resides on YouTube, Facebook, Vimeo, or some generic web server. In the case of a local media clip, CADET builds a player using HTML5 video elements and description text look and feel is controlled by the browser running CADET. In the case of YouTube or Vimeo, CADET uses those services' embed objects for the player, and description text is emulated by CADET. In the case of a generic remote clip, playback is a hybrid of HTML5 for video and emulation for the description text.
- To open a local clip:
- Open the menu and select , or press CTRL-M.
- In the dialog, navigate to and select the media clip that you want to describe. Selecting the media clip will close the dialog.
- To open a remote clip:
- Open the menu and select , or press CTRL-SHIFT-M.
- In the dialog, type (or paste) the full public URL to your clip (e.g. https://vimeo.com/12345). Note that for Youtube, Vimeo, and Facebook, the clip must be available to the public. If it's being suppressed due to purported copyright infringement issues, it will likely fail to open in CADET.
- Save the project by opening the menu and choosing, or press CTRL-S. You can save the project to any location and with whatever name you like. It's common to name the project after the media clip. For example, if you're creating descriptions for a video named "arthur.mp4," you might name the CADET project "arthur." CADET will automatically append the ".cadet" extension, resulting in a file named "arthur.cadet". If you are also creating a captioning project for the same video, you will need to give each project a different name or save it in a different directory. Otherwise, projects with the same filename will overwrite each other.
- To open a local clip:
Creating descriptions
Descriptions are typically inserted into the natural pauses in dialog or narration. Before you can write any descriptions, therefore, you must first locate sufficient pauses in the soundtrack to accommodate descriptions. Begin by watching the video and noting points where there is important information that is conveyed visually, but which will be missed by someone who cannot see the screen. Also look for pauses in the soundtrack near these points where you will be able to insert descriptions. You'll probably find it useful to simply watch the entire video, or a substantial portion of it, noting description points along the way.
After you have located pauses where you want to insert descriptions, follow the instructions below to write and time the descriptions.
- Position the video playhead exactly at the beginning of the first pause. You can drag the playhead using the mouse, but you probably will find it easier to use keyboard commands to control the player.
- Once you have the playhead positioned in the right place, put the cursor in the row of the editing grid containing the corresponding description and press CTRL-comma. This will insert a timecode into the Start cell of that row, which will mark the point at which the description should be read aloud by the narrator.
- Using the mouse or keyboard commands, move the playhead to the end of the pause. Press CTRL-period to insert a timecode into the End cell, marking the point at which the narrator should stop reading the description. In the Description/Pause Time window at the top of the editor, you will see that the length of the pause has been calculated for you. This is the amount of time into which you can fit your description.
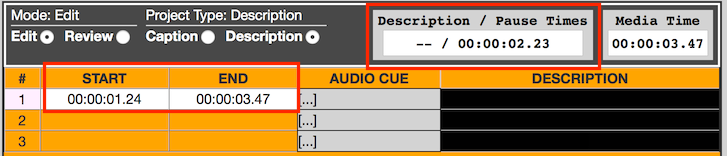
- Now place the cursor in the first Description cell and type a description. As you type, CADET will calculate the amount of time your description will require and will display this time in the Description/Pause time window. (CADET's default reading-time calculation is based on 150 words per minute, but you can change this in the dialog at any time.)

If you type more words into the Description cell than will fit into the pause interval, CADET will warn you by turning the timestamps red in the Description/Pause Time window, and also by positioning a musical note next to the timestamps themselves.

- In the Audio Cue cell, type the words of dialog or narration that you hear just before the description pause. This cue text will be useful when you are recording the descriptions once you have finished your project.
- After you have finished typing the first description, press the Enter key twice to insert a new row in the editor. The cursor will automatically be positioned in this new row.
- Move the playhead to the beginning of the next pause where you want to insert a description.
- Repeat steps 2-7 to time and type each description in the project until you are finished. When you reach the last description, press the Enter key twice to insert a blank row at the bottom of the editor.

- Now you are ready to review the descriptions in CADET.
Review descriptions
CADET comes with a feature called text-to-speech, or TTS, that converts the descriptions that you have typed into speech, and plays those descriptions at the time intervals you have specified int the description project. You must be connected to the Internet in order for the TTS to work. Please note: the TTS reading speed is currently not adjustable, and may not reflect the words-per-minute setting that you have set in CADET's preferences.
To use CADET's TTS review feature, follow the steps below.
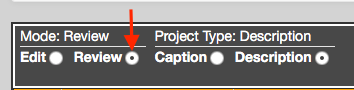
- Press CTRL-ALT-S to rewind the video to the beginning. In the CADET editor, press the Review radio button in the Mode group at the top of the editing window. (You can also press CTRL-E to toggle between Edit and Review modes.)
- Position the cursor in the first description cell.
- Press CTRL-spacebar to begin playing the video. At the first pause interval where you typed a description, you will hear CADET speak the text that you typed. At the same time you will also see the text displayed in the player window. Both the speech and the corresponding display of text are for your reference only-- viewers will not see the text when they watch the completed and described video.
- If you need to correct any errors to the description text, simply press CTRL-spacebar to pause the video, make the necessary changes, then resume reviewing the project. (See the list of keyboard shortcuts for commands that will move the video playhead in small increments, giving you frame-accurate timing.) You will hear (and see) changes to the descriptions immediately within CADET.
Now you're ready to export a description script for use when recording the descriptions.
Exporting descriptions
Once you have finished writing and timing the descriptions, the next step is to export them. The exported file, or script, can then be printed and carried into a recording studio, where a human narrator will read and record the descriptions, or the narrator can simply read the descriptions from a computer screen. (Learn more about how to record audio descriptions.)
Follow these steps to export your work.
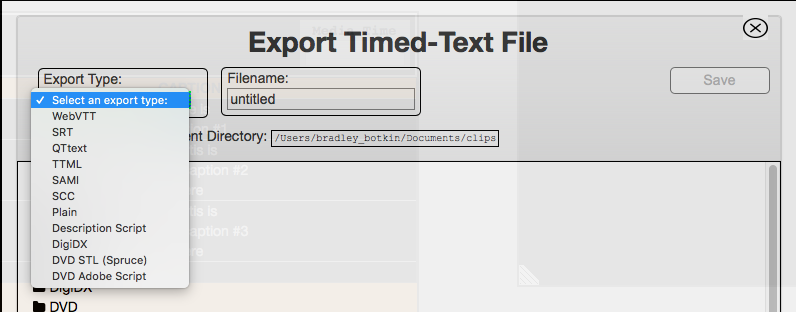
- Choose menu and select .
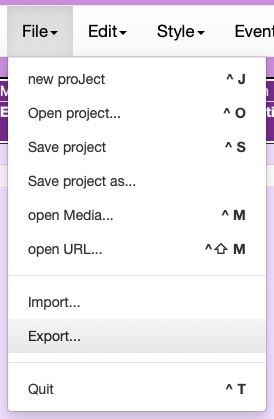
- From the dialog, open the Export Type drop-down list and choose "Description Script." By default, the name of the file will be the same as the base name of the media clip. Change the filename if you want to, then press the Save button.
- CADET will save the description project as an HTML document in the same directory as the media clip, and then will automatically open that document in a new browser window. If you want to print the description script, simply use the print commands for your browser.
Timed-text formats and platforms
The following table shows typical timed-text formats that are compatible with various browsers and media-hosting Web sites.
| Browser platform, Web site or application |
Compatible timed-text formats |
|---|---|
| Internet Explorer (using HTML5 <video> element) |
|
| Firefox, Chrome or Safari (using HTML5 <video> element) |
|
| YouTube |
|
|
|
| Vimeo |
|
| Quicktime Player |
|
| DigiDX (Description authoring application) |
|
| DVD authoring applications (DVD Studio Pro, Encore, etc.) |
|