Tools & Guidelines
MAGpie2 Captioning
NEXT | CONTENTS

One option – Background color – applies to the entire caption area. It is possible to apply both a background color to caption or speaker text and a different background color to the caption area as a whole (sometimes with unfortunate results!)

MAGpie users should be aware that not all formatting options will appear in each media player, due to differences in the text formats for the respective players. The table below provides information about formatting options supported by the different players. Note that BlackBerry smartphones (TTXT file format) currently ignore all style markup. However, users can select from a set of predefined color and text-size options directly on the smartphone.

To move from cell to cell using the keyboard, the table must be in navigation mode. To exit editing mode and enter navigation mode, press shift + enter on the keyboard. When in navigation mode, the focus rectangle is white, as shown in the image below. notice also that while in navigation mode the style toolbar is greyed to indicate that it is unavailable.


If all captions need to be styled the same, adjust the caption track style in the Properties dialog box.
MAGpie also offers a spell checking feature, which is located in the menu. The spell checker only checks the track that is currently being edited.

If you choose BlackBerry/TTXT export, you'll have the option to create just the TTXT file or to integrate that TTXT file into a copy of the source video (MAGpie will not integrate the caption file into the original source video). Choosing to integrate the captions into the movie will result in a closed-captioned presentation. Once the movie is transferred to the BlackBerry smartphone, the user can choose to decode and view the captions. Note that these devices currently support the integration of a single caption track.
To create a stand-alone TTXT file only, just press the Export as TTXT button. If you want to integrate a TTXT file into a copy of the movie, you must first download and install MP4Box. From the TTXT export window, choose the caption track you want to use and then check the Remux box, as shown in the image below. NOTE: The first time you choose this option you will also need to press the Browse button and browse to MP4Box.exe, which is typically located in C:/Program Files/GPAC. (You'll only need to do this once. MAGpie will remember its location after that.)

Press the Export as TTXT button and MAGpie will invoke MP4Box to automatically integrate the caption track into a copy of the source video. This new movie (which will have "_cc" added to the filename) may then be transferred to a BlackBerry smartphone.
Other notes regarding exports:
NEXT | CONTENTS


© 2003 CPB/WGBH National Center for Accessible Media. All rights reserved.
BlackBerry and RIM ©2010 Research In Motion Limited. All rights reserved. BlackBerry®, RIM®, Research In Motion®, SureType®, SurePress™ and related trademarks, names and logos are the property of Research In Motion Limited and are registered and/or used in the U.S. and countries around the world.
Starting a Captioning Project
- Start MAGpie, open the menu, and select .
- In the dialog, click on the button to
choose the base media to which you want to add captions. This step is required.
- Choose the Apple QuickTime Player button if the base media is a QuickTime (MOV) clip; choose the Oratrix GRiNS Player button if the base media is a Real media (RM) clip. WAV, MPEG/MPG and AVI clips will open in either player.

- Accept MAGpie's style defaults or choose your own caption and speaker styles.
- Unless adding segments to captions for a karaoke-like effect, ignore the settings. For more information about segmenting captions, read the section on segmenting captions.
- Enter the dimensions of the video and caption regions. If you don't know the dimensions, you can change the default values at a later time after locating the video height and width from a media player (for instructions on determining height and width of a video, read the section on determining video dimensions.

- Click to close the dialog.
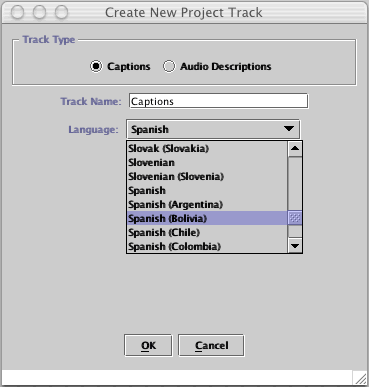
- In the next dialog box, titled , choose the Captions button.

- Accept MAGpie's default track name or type in one of your own. The track name is particularly important if there are multiple caption tracks. Note that BlackBerry® smartphones currently support the inclusion of a single caption track.
- Select the language for the caption track from the drop-down list.
- Click to close the dialog.
- Save the project by opening the menu and choosing. It is important to save the project file in the same directory as the base media. The caption files created for playback will automatically be saved in the same directory as the base media. Note: for efficient file management, save each new project in a separate directory.
Modifying caption styles for all caption tracks in a project
There are several formatting options for caption and speaker text. These options are familiar to users of most word processing applications. These options can be applied separately to captions and speaker text by first selecting the radio button adjacent to the preview area for captions or speaker text and setting desired options.
One option – Background color – applies to the entire caption area. It is possible to apply both a background color to caption or speaker text and a different background color to the caption area as a whole (sometimes with unfortunate results!)

MAGpie users should be aware that not all formatting options will appear in each media player, due to differences in the text formats for the respective players. The table below provides information about formatting options supported by the different players. Note that BlackBerry smartphones (TTXT file format) currently ignore all style markup. However, users can select from a set of predefined color and text-size options directly on the smartphone.
| Formatting option | QuickTime Player | RealPlayer | Windows Media Player | Notes |
|---|---|---|---|---|
| Font | Displays correctly if font is installed on viewer's computer | RealText limits caption authors to a subset of fonts. Real's RealText specification |
Displays correctly if font is installed on viewer's computer | With each player, it is important to choose fonts that users will be likely to have on their system. Fonts are not embedded, so if the user doesn't have a specific font, a substitute will be selected. |
| Font Size | Displays correctly | RealText uses HTML font sizing, resulting in 7 different font sizes. MAGpie offers 8 font sizes. As a result, font size 8 and 10 in MAGpie are the same when viewed in RealPlayer. | Displays correctly | Particularly when delivering content for cross-platform viewing, it is important to test MAGpie's output due to differences in font rendering. |
| Bold, Italics, Underline | Displays correctly | Displays correctly | Displays correctly | |
| Left align, Center align | Displays correctly | Displays correctly | Displays correctly | |
| Right align | Displays correctly | RealText is unable to display right-aligned text. Right-aligned text will appear left-aligned. | Displays correctly | |
| Text Foreground (text color) | Displays correctly | Displays correctly | Displays correctly | |
| Text Background (text highlight color) | MAGpie's output for QuickTime is unable to display a background color for text. | Displays correctly | Displays correctly | |
| Background color | Displays correctly | Displays correctly | Displays correctly. It is possible to have a separate background color for speaker and caption areas in Windows Media, however, MAGpie doesn't support this functionality. |
The Caption Authoring Interface
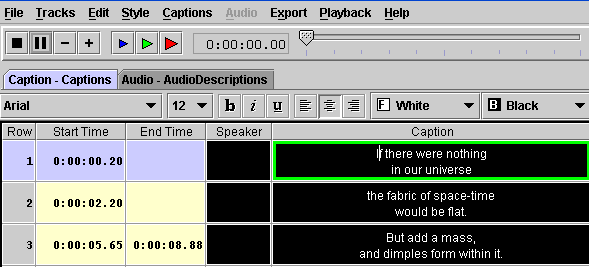
The captioning interface is centered around a table where each row represents a single caption. This table has 5 columns:- Row: The row number. Row 1 represents the first caption.
- Start Time: Once captions are timed, cells in this column contain times that the captions appear. Caption authors can modify the values in this column manually, but should be careful to ensure that the times entered are sequential.
- End Time: If there are long pauses (greater than 5 seconds), a caption may need an end time to indicate when the caption should disappear. Typically captions disappear when replaced by the next caption in the sequence, so cells in this column are likely to be empty when captioning continuous speech.
- Speaker: If a speaker identification is needed, cells in this column will contain the speaker's name. If a speaker name is used in one row, it will be copied to the next row when a new caption is added.
- Caption: The caption text. The contents of this cell may vary depending on use. For suggestions on captioning conventions, the Media Access Group at WGBH in Boston provides a guide: Suggested Styles and Conventions for Closed Captioning

To move from cell to cell using the keyboard, the table must be in navigation mode. To exit editing mode and enter navigation mode, press shift + enter on the keyboard. When in navigation mode, the focus rectangle is white, as shown in the image below. notice also that while in navigation mode the style toolbar is greyed to indicate that it is unavailable.

Write or Import Captions
Once the editor and player are visible on the screen, use to play and pause the media file as you transcribe the audio, or use the player controls located at the top of the editor. To get captions into the caption grid, do one of the following:- Type caption text into the cells in the far right-hand column. Each cell represents one caption. To create a new caption cell, press the or key twice. Speaker identifications, if desired, may be typed in the "speaker" column.
- A plain text caption file can be imported into the current caption track by selecting the menu and choosing . The plain text file can contain a large block of text that will be imported into a single cell, or it can contain text with two returns at the end of each caption which will result in the text being imported into individual caption rows.
Import captions from MAGpie 1.0
- Use MAGpie 1.0 to output a , or presentation.
- Close MAGpie 1.0 and open MAGpie 2.0.
- Start a new project.
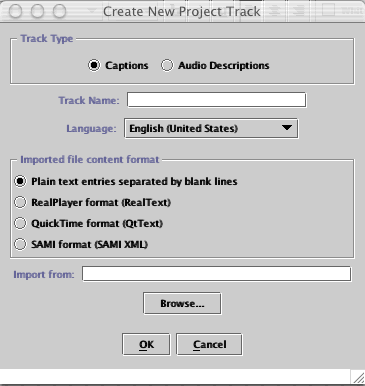
- Open the menu and choose . From the dialog box, choose either the RealText, QtText or SAMI option, whichever corresponds to the MAGpie 1.0 output from step 1.
- Press the button and locate the text file you created in step 1.
- Give the track a name and press .
Working with caption text in MAGpie
MAGpie offers familiar options for modifying the style of captions. The style toolbar located directly above the caption table contains common formatting options, such as font, font size, foreground and background color, and others.If all captions need to be styled the same, adjust the caption track style in the Properties dialog box.
MAGpie also offers a spell checking feature, which is located in the menu. The spell checker only checks the track that is currently being edited.
Time the Captions
- "Rewind" the base media. Place the cursor in first row of the editor. Play the media and, when you hear the first word of the first caption, press to assign a start time (the time at which the caption will appear on the screen) to that caption. Note that the cursor will jump to the next caption cell after MAGpie records the timecode. Press again to assign a start time to the next caption. Continue this process until all the captions have start times assigned to them. You do not need to stop the media after timing each caption. If you make a mistake, stop the media, rewind and re-time the captions as necessary. You may also change timecodes manually, although it is important to ensure that the timecodes remain sequential.
- To add an end time to a caption (the time at which you want the caption to disappear from the screen; when there is a pause in the audio, for example), press . However, if you want the captions to appear one after the other without pause, you do not need to add an end time to each caption.
Review Your Work
To review your work at any time, press to play the base media with captions. You can re-edit, re-time and review the captions as many times as you wish.Add Another Caption Track
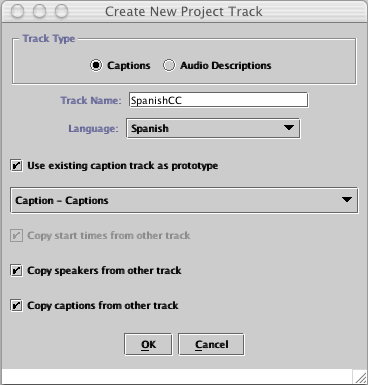
- If you want to add another caption (or subtitle) track to your project, open the menu and choose . Select the button and give the track a name (or accept MAGpie's default track name). If you are adding a foreign-language subtitle track, choose the language from the drop-down list. If you plan to manually type the new track's captions (or import them from another source as outlined above), press OK. However, if you want to use a track from the current project as a prototype for the new track, check the checkbox, select the track from the drop-down list and check the appropriate options (copy start times from other track, copy speakers from other track, copy captions from other track). Press OK when finished.

- Edit, time and review the new caption track as described above. To switch between tracks, click on the track tabs at the top of the editor or open the Tracks menu and choose from the track list.
Export the Project and Test the Presentation
- When you're satisfied with your work, open the menu and choose , , , to export the presentation.

If you choose BlackBerry/TTXT export, you'll have the option to create just the TTXT file or to integrate that TTXT file into a copy of the source video (MAGpie will not integrate the caption file into the original source video). Choosing to integrate the captions into the movie will result in a closed-captioned presentation. Once the movie is transferred to the BlackBerry smartphone, the user can choose to decode and view the captions. Note that these devices currently support the integration of a single caption track.
To create a stand-alone TTXT file only, just press the Export as TTXT button. If you want to integrate a TTXT file into a copy of the movie, you must first download and install MP4Box. From the TTXT export window, choose the caption track you want to use and then check the Remux box, as shown in the image below. NOTE: The first time you choose this option you will also need to press the Browse button and browse to MP4Box.exe, which is typically located in C:/Program Files/GPAC. (You'll only need to do this once. MAGpie will remember its location after that.)

Press the Export as TTXT button and MAGpie will invoke MP4Box to automatically integrate the caption track into a copy of the source video. This new movie (which will have "_cc" added to the filename) may then be transferred to a BlackBerry smartphone.
Other notes regarding exports:
- If you exported a SMIL project, open the SMIL file (projectname.qt.sml or projectname.real.smil) in the QuickTime Player or RealPlayer, respectively.
- If you exported a SAMI project, open the base media in Windows Media Player. If you find mistakes in the captions, make all necessary changes to the MAGpie project, re-export and test the presentation again using the appropriate player.
- DFXP files can currently be played back with certain Flash players. NCAM has released two tools to assist with Flash captioning:
- "CC for Flash" is an Adobe Flash authoring component which synchronizes DFXP (and QuickTime with some limitations) caption files to Flash video playback. When installed into the Flash authoring environment, instances of this component can be placed on the stage and easily wired to video playback objects to synchronize the captions during playback.
- ccPlayer is a compiled Flash movie which wraps the "CC for Flash" component. It can be embedded in an HTML page to get up and running with captioned Flash movies without the need to do Flash authoring. Many of the authoring-time properties can even be passed into ccPlayer from the HTML page as parameters allowing for some customization.
- If you are captioning a project for a YouTube video, export either DFXP, SAMI or RealPlayer (RealText) captions and then upload the file to YouTube. Read the instructions for uploading captions to YouTube, bearing in mind that you do not need to change the file's extension to .SRT or .SUB, nor do you need to reformat the timecodes. Simply upload the file as is. Note that the YouTube conversion process may introduce unusual line breaks into the captions, so be sure to test and review the captions carefully before linking to the captioned YouTube video.
NEXT | CONTENTS
© 2003 CPB/WGBH National Center for Accessible Media. All rights reserved.
BlackBerry and RIM ©2010 Research In Motion Limited. All rights reserved. BlackBerry®, RIM®, Research In Motion®, SureType®, SurePress™ and related trademarks, names and logos are the property of Research In Motion Limited and are registered and/or used in the U.S. and countries around the world.

